
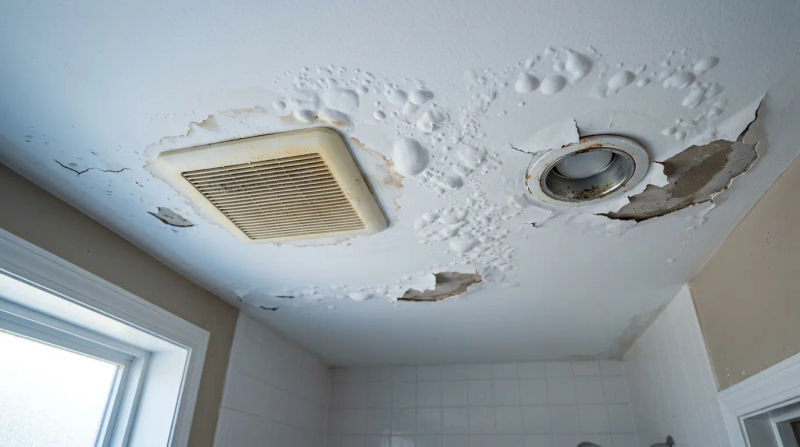
As a property maintenance lead here in the Champlin area for over a decade, I’ve seen a common pattern emerge every September. The long, hot days of summer give way to crisp evenings, and we start closing our windows to keep the chill out. It’s right around this time that I get calls from homeowners who have just noticed something unsettling after a hot shower: small, blister-like bubbles forming on their bathroom ceiling.
If this sounds familiar, you’re not alone. This is one of the most frequent issues our technicians encounter, especially as Minnesota’s seasons change. That bathroom paint bubbling isn’t just a cosmetic annoyance; it’s a clear signal that something is amiss. Trapped moisture is looking for an escape route, and your paint is the first casualty. Understanding the cause is the first step toward a lasting solution, preventing a small problem from turning into a major repair this winter.
Common Signs and Symptoms
Before you can fix the problem, you need to know exactly what you’re looking for. The signs of moisture damage can be subtle at first but will worsen over time if the root cause isn't addressed. Our crews are trained to spot these early indicators during any project evaluation.
- Bubbles or Blisters: This is the most obvious symptom. You'll see raised, bubble-like pockets in the paint film. These can range from tiny pinhead-sized blisters to larger, more noticeable bubbles. They might feel soft and squishy if the moisture is fresh, or hard and brittle if the paint has dried and re-adhered slightly.
- Peeling or Flaking Paint: If left unaddressed, those bubbles will eventually break. The paint film loses its adhesion to the surface below, leading to cracking, flaking, and peeling. You might find small chips of paint on the floor, vanity, or in the bathtub.
- Discoloration and Stains: Often accompanying the bubbles are yellow or brownish stains. This is a sign that water and surfactants (soap-like ingredients in the paint) have been trapped behind the paint film for a while. These stains, known as surfactant leaching, are a clear indicator of a chronic moisture issue.
- Soft or Spongy Drywall: This is the most serious sign. Gently press on the area around the bubbling paint. If the ceiling or wall feels soft, spongy, or gives way under light pressure, it means the moisture has penetrated the paint and is damaging the underlying drywall. This requires more immediate and intensive repair.
What Causes This Problem
Understanding the bathroom ceiling paint blistering causes is crucial for a permanent fix. Simply scraping and repainting without addressing the source will only lead to the bubbles returning. Here are the most common culprits we see in homes around the Champlin area.
1. Excessive Humidity and Trapped Moisture This is the primary cause. Every hot shower or bath releases a significant amount of steam into the air, dramatically increasing the room's humidity. When this warm, moist air hits the cooler surface of the ceiling, it condenses into water droplets. If this moisture can't escape, it will try to absorb into the ceiling, getting trapped behind the paint layer and forcing it outward into a bubble. This is fundamentally why paint bubbles in a humid bathroom.
2. Inadequate Ventilation Proper ventilation is non-negotiable in a bathroom. If your exhaust fan is undersized, clogged, or non-existent, it can’t effectively remove the steamy air. Many homes in our area, particularly the Split-level and Bi-level styles built in the 1960s and 1970s, were often constructed with less powerful fans than we'd consider standard today, or sometimes none at all in smaller bathrooms. As we seal our homes up for the cooler fall and winter months, this lack of mechanical ventilation becomes a major problem.
3. Improper Surface Preparation The durability of a paint job is determined long before a brush is ever dipped in paint. If the ceiling surface wasn't cleaned thoroughly to remove dust, grease, or soap scum before painting, the new coat can't form a strong bond. Likewise, skipping a high-quality primer, especially on new drywall or over a previous glossy finish, is a recipe for failure. Moisture will exploit any weakness in adhesion.
4. Using the Wrong Type of Paint Not all paints are created equal. Using a standard flat latex paint on a bathroom ceiling is a common mistake. This type of paint is porous and will absorb moisture, leading to bubbling and mildew growth. The best paint for a steamy bathroom ceiling is a specialty paint formulated for high-moisture environments. Look for products labeled as "kitchen and bath" paint. These have a tighter film, are more durable, and contain mildewcides to inhibit mold growth. A satin or semi-gloss finish is also preferable to a flat finish, as it's less permeable and easier to clean.
5. Painting Over a Damp Surface Patience is a virtue in painting. If a ceiling is painted while it's still even slightly damp - whether from a recent shower or a previous repair - that moisture gets trapped beneath the new paint film. As the substrate dries, that moisture vapor pushes outward, creating blisters from behind.
6. An Underlying Water Leak Sometimes, the source of the water isn't condensation from inside the bathroom. The bubbling could be a symptom of a slow leak from a plumbing line in the floor above, a failing toilet seal, or even an issue with the roof or attic insulation directly above the bathroom. If the bubbling is concentrated in one specific area and appears even when the bathroom hasn't been used, a hidden leak is a strong possibility.
When to Call a Professional
Deciding whether to tackle this as a DIY project or call for expert help depends on the severity of the issue and your comfort level with the repair process.
A DIY approach may be suitable if:
- The bubbling is very minor and covers a small, localized area.
- You are confident the cause was a one-time issue (e.g., you forgot to run the exhaust fan for a week) and not a chronic problem.
- You're prepared to do the job correctly: scrape all loose paint, sand the area smooth, clean it thoroughly, apply a stain-blocking primer, and finish with two coats of high-quality bathroom paint.
You should call an experienced professional when:
- The paint is bubbling or peeling across a large section of the ceiling.
- The drywall feels soft, spongy, or is visibly sagging. This indicates structural water damage that needs to be properly repaired and dried out.
- You suspect the source is a plumbing or roof leak. A painting professional can often help diagnose the source or recommend another trade expert if needed.
- The problem keeps coming back after you've tried to fix it yourself. This means the root cause wasn't solved.
- You want the peace of mind that the job is done right. Our technicians follow a standardized workflow that includes thorough surface preparation, using the correct materials for a high-humidity environment, and ensuring a durable, long-lasting finish.
Conclusion
Seeing your bathroom ceiling paint bubble can be frustrating, but it’s a problem that can be solved permanently. The key is to look beyond the symptom and identify the root cause. Whether it's improving ventilation, properly preparing the surface, or choosing the right materials, addressing the source of the moisture is the only way to ensure your new paint job lasts.
As we head into the colder Minnesota months, don't ignore these early warning signs. Acting now to diagnose and resolve the issue will save you from more extensive and costly repairs down the road. A small bubble today can become a failed ceiling tomorrow.
If you notice any of these signs, contact a local painting professional for an inspection. They can help you accurately diagnose the problem and recommend the most effective solution for your home.